Infrastructure
The course does not use any university-specific resources. It is designed to run entirely on students’ machines using solely open-source software.
Communication
Students enrolled in the course at Charles University will be using a dedicated Microsoft Teams team facilitating both asynchronous discussion and synchronous teaching.
Code management and submissions
The course will be using materials gradually released at this website. In the beginning, the students are expected to download a folder and work locally within it. Part of the folder will be a definition of the software stack.
Software stack
There are many options on how to run Python. You may already have a copy on your machine, you can run it in the browser and install it in a myriad ways. This course uses what is considered a standard for scientific computing based on two key components - a package manager (you will be using Pixi) and an interface (Jupyter Lab).
The basics will be explained in the first lesson.
1. Install Pixi
The main tool dealing with the setup of the coding environment used in this course is Pixi. Go to Pixi website, and follow the installation instructions to install it on your machines.
2. Get the folder and install the environment
Download the folder available at https://martinfleischmann.net/sds/spatial-data-science.zip and unzip at a preferred location. The folder contains the definition of the environment.
- Download the folder to a location on your machine where you’d like to store the files for this course.
- Use Powershell (Windows) or Terminal (macOS, Linux) to navigate to the folder. Do this by typing
cdand dragging and dropping the folder to the shell window. Then hit Enter. - Install the enviroment using
pixi install. - Start the Jupyter Lab interface using
pixi run jupyter lab.
That is all!
Closing and reopening Jupyter Lab
The best way to close the Jupyter Lab and shut down its process running in the terminal is to use the Jupyter Lab’s interface. In the menu find File > Shut Down.
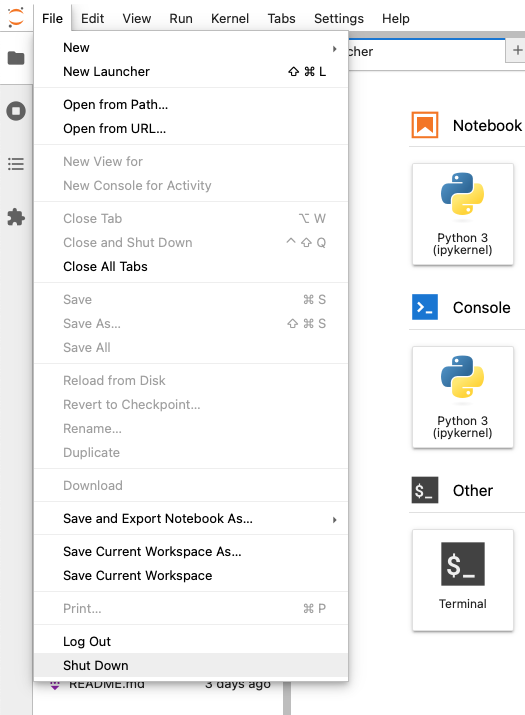
Next time, navigate to the folder and run pixi run jupyter lab again.
If you prefer to use conda over Pixi, you can follow the instructions below.
If you have Anaconda, conda, or mamba installed, use that directly. Just start Anaconda Prompt (or any other relevant prompt) or Terminal and start with the point Create a Python environment.
Windows may complain that the app is not recognised. Click More information and you will be able to run the installer.
- Download
minicondapackage manager from Anaconda for your operating system. - Execute the installer and make sure to create start menu shortcuts (there’s a tick box during installation).
- Open the installed
Anaconda Promptapplication. - Configure
condato avoid automatic activation of the base environment. You should never use it to avoid issues in the future.
conda config --set auto_activate_base false- Create a Python environment using the following command:
conda env create -f https://martinfleischmann.net/sds/environment.yml- Activate the environment using:
conda activate sds- Start JupyterLab interface:
jupyter labEnsure that you install miniconda in a directory without any special characters in the name. It may occasionally break things.
- Download
minicondapackage manager from Anaconda for your operating system and install it. - Open
Terminalapplication. - Configure
condato avoid automatic activation of the base environment. You should never use it to avoid issues in the future.
conda config --set auto_activate_base false- Create a Python environment using the following command:
conda env create -f https://martinfleischmann.net/sds/environment.yml- Activate the environment using:
conda activate sds- Start JupyterLab interface:
jupyter labA Jupyter Lab interface will show up in your browser. If it hasn’t opened automatically, copy the link printed in your command line/terminal.
Closing Jupyter Lab
The best way to close the Jupyter Lab and shut down its process running in the terminal is to use the Jupyter Lab’s interface. In the menu find File > Shut Down.
Opening Jupyter Lab next time
The steps above are needed only the first time. Once you create the environment, it won’t disappear and you can use it until you don’t delete it. Once you close Jupyter Lab session, you can always start a new one:
- Open
Anaconda Prompt - Activate the environment:
conda activate sds- Start JupyterLab interface:
jupyter lab- Open
Terminal - Activate the environment:
conda activate sds- Start JupyterLab interface:
jupyter labYou should never use conda install in the base environment. Remember to always activate the environment.
Plan B with Google Colab
If you are unable to install an environment using the instructions above, you can follow the course using Google Colab. You will just need to install the required packages to your Colab environment. Reach out in class or via Teams if you need to set it up.
Troubleshooting
In case of any issues related to environment creation, reach out in the class or via Teams.